[ad_1]
Every of the 20 Historical Magic Hotspots is a trial in Hogwarts Legacy that gamers should clear to acquire three Historical Magic Traces.
These traces of historic magic improve the Historical Magic Meter, which permits gamers to drag off highly effective finishers extra incessantly with a bigger Historical Magic Meter.
Within the tougher areas of Hogwarts Legacy, this is a useful useful resource that gamers will need to have loads of.
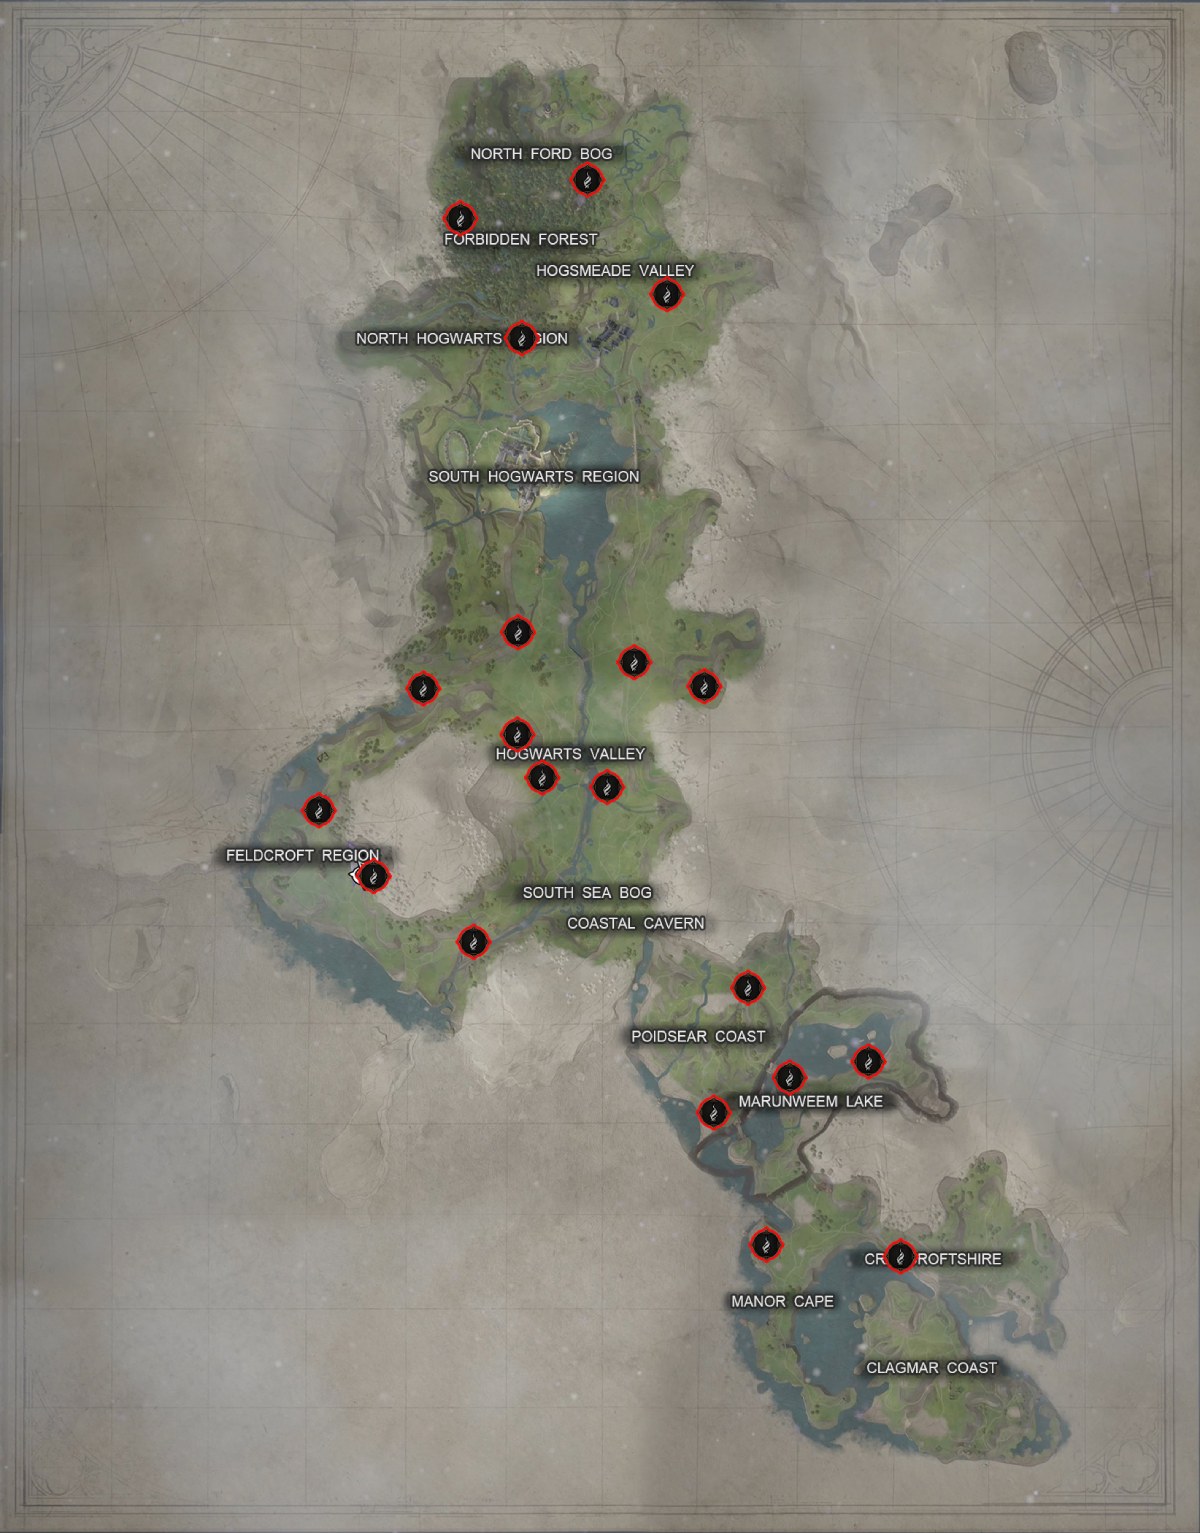
There are 20 completely different Historical Magic Hotspot Places to seek out round Hogwarts Legacy:
Beneath is a map of each Historical Magic Hotspot location in Hogwarts Legacy.
In case you want help with any of the paths, they’re defined in additional element on this information.

Methods to Remedy Hogwarts Legacy Historical Magic Hotspots
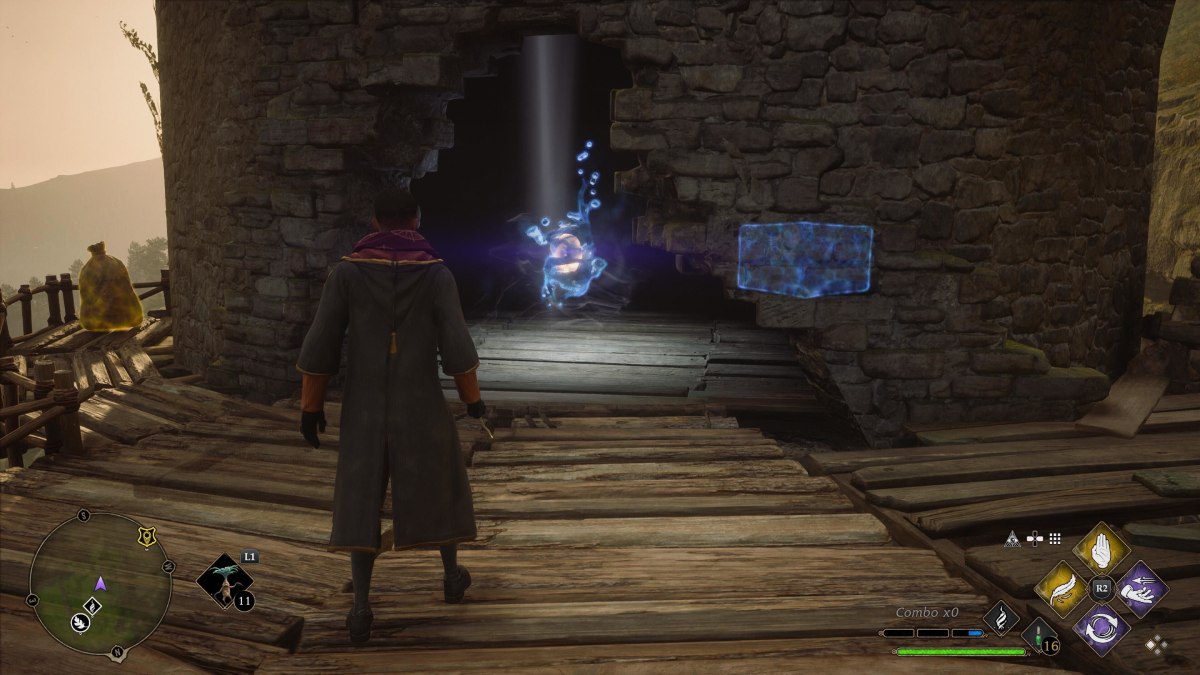
To resolve an Historical Magic Hotspot, gamers should examine a pool of historic magic and discover the three Historical Magic Traces that materialize.
All the Historical Magic Hotspots perform in an analogous manner:
- Discover the Historical Magic Hotspot.
- Observe the traces of historic magic that seem from the ground.
- The identical mechanic within the first mission of Hogwarts Legacy, the place it’s essential to discover Professor Fig in Gringotts.
- Examine the pool of historic magic by interacting with it.
- Discover three traces of historic magic.
- This seems as a type of floating silver blob.
- These traces of historic magic may have a silver beam stemming from the situation of the Historical Magic Hotspot revealed with Revelio.
- Every Historical Magic Hotspot may have completely different puzzles to resolve and spells that gamers might want to use to acquire all three Historical Magic Traces.
- When you’ve discovered all three, you’ll have accomplished the Historical Magic Hotspot.
It’s value noting that obtaining your broom is very beneficial that will help you navigate the challenges extra rapidly.
A number of of the Historical Magic Hotspots happen within the tougher areas of Hogwarts Legacy, so you’ll want to have the best loot attainable to take care of any enemies.
However some Historical Magic Traces are higher hidden than others. Fortunately, now we have all the data you’ll want to discover all of them rapidly to extend your particular meter.
Forbidden Forest
Forbidden Forest Historical Magic Hotspot #1
- Closest Floo Flame – North Ford Lavatory Entrance
- Spells Wanted: Incendio
- Broom/Mount Required? – No
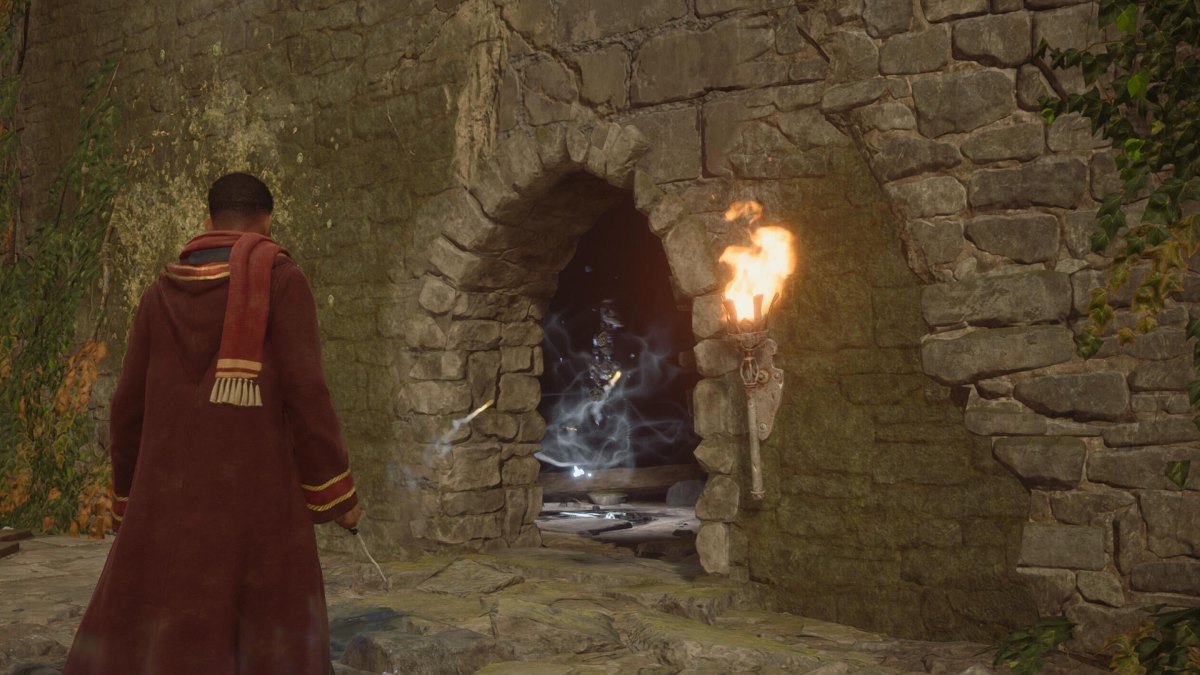
This hotspot is discovered within the northeastern space of the Forbidden Forest. While you arrive to the situation, you’ll discover a ruined citadel with spiderwebs in every single place.
The Historical Magic Hotspot is close to the inexperienced tree.


- When you activate, the three traces of historic magic are comparatively straightforward to seek out.
- The primary is situated on to your proper. Use Incendio to defeat the spiders and stroll via the spiderwebs to seize it.


- The second is on to the left of the primary one. Leap over the small brick ledge and head below the damaged picket platform.


- For the third one, head again to the place you discovered the pool of historic magic. Forged Incendio on the archway earlier than you take away the spiderwebs.


- Climb the picket platforms, and the Historical Magic Hint is on the high alongside a chest.
Forbidden Forest Historical Magic Hotspot #2
- Closest Floo Flame – West Forbidden Forest
- Spells Wanted: N/A
- Broom/Mount Required? – No
This Historical Magic Hotspot is discovered southwest of the West Forbidden Forest Floo Flame.


- While you arrive, you’ll come throughout a citadel with 4 frog statues inside, alongside the traditional magic pool.


- Work together with the pool to begin the trial and launch the Historical Magic Traces.
- Work together with the fourth frog, the rightmost one, and it’ll ship you on to the primary hint.


- Slide down the ground and make your manner again to the doorway.
- Work together with the third frog, which is able to ship you to a picket platform above the citadel. Head west alongside the picket platform.


- Ultimately, you’ll come throughout a damaged picket platform. The hint is on the opposite facet. Leap throughout to seize the second Historical Magic Hint.
- Head again to the frog statues and work together with the primary frog. This can lead you straight right into a room with the third and last hint.


Hogsmeade Valley
Hogsmeade Valley Historical Magic Hotspot #1
- Closest Floo Flame – East Hogsmeade Valley
- Spells Wanted: N/A
- Broom/Mount Required? – No
This hotspot is discovered southwest of the East Hogsmeade Valley Floo Flame.


- You’ll see a ruined citadel within the distance. That is the situation of the Historical Magic Hotspot.
- Work together with the traditional magic pool to provoke the trial and launch the traces.
- You’ll discover a hint immediately in entrance of you behind a locked door. To get round this, climb the ladder to the appropriate of the door.


- Observe the trail and use Incendio on the vines protecting the arched doorway.
- The primary magic hint is immediately in entrance of you after you enter the arched doorway.


- Fortunately, the second magic hint can also be in the identical room. In case you look in direction of the room’s northwest nook, you’ll see the traditional magic hint on the high of a picket platform.
- Climb the platform to succeed in the magic hint.


- To achieve the ultimate magic hint, solid the default spell (Press R2/RT) on the hanging platform mechanism. This can trigger it to drop beneath.


- Leap into the hole; the third and last historic magic hint is earlier than you.


North Hogwarts Area
North Hogwarts Area Historical Magic Hotspot #1
- Closest Floo Flame – The Collector’s Cave
- Spells Wanted: Incendio, Accio, Depulso
- Broom/Mount Required? – No
This hotspot is situated northwest of The Collector’s Cave Floo Flame.


- Stroll in direction of the pool of historic magic to activate the trial.
- The primary magic hint is immediately in entrance of you. Use Incendio to clear the leaves from the doorway.
- Stroll in direction of the pedestal the hint is on, and also you’ll robotically take up it.


- Behind the pedestal, you’ll see picket floorboards. Use Depulso to destroy them.


- Leap into the hole, and the second historic magic hint is to the left of the tomb.


- Use Revelio, and also you’ll reveal fairly just a few issues. Crucial one proper now could be the deal with on the jap wall.


- Use Accio on the deal with to disclose the third and last Historical Magic Hint.


- You’ll want to make use of Revelio to focus on all of the bones scattered across the room to climb out of the tomb.


- Forged Accio on the bones and convey them to the bone totem close to the hole within the ceiling. They may robotically flip right into a bridge.
Hogwarts Valley
Hogwarts Valley Historical Magic Hotspot #1
- Closest Floo Flame – Decrease Hogsfield
- Spells Wanted: Depulso, Accio, Levioso
- Broom/Mount Required? – No
This Historical Magic Hotspot is situated southwest of the Decrease Hogsfield Floo Flame.


- Head into the courtyard to activate the pool of historic magic.
- You might must defeat just a few enemies in the event that they roam inside.
- The primary Historical Magic Hint is within the southwestern nook of the courtyard. You’ll discover it behind a locked door.
- Make your manner exterior of the courtyard via the jap entrance. Take a direct proper and comply with the citadel wall.
- You’ll spot just a few barrels protecting a gap into the citadel alongside the wall. Destroy the barrels, and also you’ll get hold of the primary magic hint.


- The second Historical Magic Hint is on the southern nook of the courtyard. Stroll in direction of the picket platform that could be a bit out of attain.
- Subsequent to this platform is a doorway with picket panels blocking your manner—Forged Depulso to destroy the panels and reveal a small platform you should utilize.


- Forged Accio on the small platform to maneuver it in entrance of the picket platform. As soon as the platform is in place, use Levioso to elevate the platform up.


- Now you can climb onto the platform and the picket platform. Observe this path, and also you’ll come nose to nose with the second Historical Magic Hint.


- Head again to the courtyard. In case you look to the western nook, it’s best to see a small, closed room.
- Forged Accio on the small platform and navigate it towards the wall of that room. You must see a golden ledge close to the roof.
- Use Levioso as soon as once more to boost the platform and use it to climb to the roof of this room.


- While you attain the highest, it’s best to see a gap within the roof with the third Historical Magic Hint inside.


Hogwarts Valley Historical Magic Hotspot #2
- Closest Floo Flame – Central Hogwarts Valley
- Spells Wanted: Incendio, Depulso, Accio
- Broom/Mount Required? – No
This hotspot is situated southeast of the Central Hogwarts Valley Floo Flame. It’s straightforward to identify on the map because of the ruined citadel determine.


- Head contained in the courtyard, and also you’ll see a big picket platform. On the facet of this platform are some vines. Use Incendio to clear them out.
- As soon as the vines are cleared, you’ll see a ladder to the platform’s high. When you attain the highest, you’ll be able to see the pool of historic magic. Work together with the pool to start the trial.


- The primary Historical Magic Hint is immediately in entrance of the platform you’re on. Leap down, and also you’ll discover it locked behind a doorway.
- Use Depulso on the spinning pillar to your proper to open the gate.


- As soon as the gate is open, you’ll be able to seize the primary Historical Magic Hint.


- The second Historical Magic Hint is discovered northeast. You’ll see a small archway coated in vines. Use Incendio to clear the vines and head via.


- On the opposite facet, you’ll see a platform. Use Accio to maneuver the platform close to the ledge. Climb on the platform after which onto the ledge.


- Observe the ladder, and also you’ll discover the second Historical Magic Hint.


- Head down the spiral staircase and use Depulso.
- The ultimate Historical Magic Hint is close to the place you discovered the primary magic hint. On this room is one other spinning pillar. Use Depulso on it to open the door to your left.
- Head out the door and make a fast proper.
- Observe the picket platform, and also you’ll come throughout some vines. Use Incendio to clear them out.


- You must see a ladder.
- Climb the ladder, and also you’ll discover the final Historical Magic Hint.


- To entry it, you’ll must burn the vines round it.


Hogwarts Valley Historical Magic Hotspot #3
- Closest Floo Flame – Brocburrow
- Spells Wanted: N/A
- Broom/Mount Required? – No
This Historical Magic Hotspot is south of the Brocburrow Floo Flame in Hogwarts Valley.


- You’ll discover the pool of historic magic exterior the citadel close to a large spiderweb. Work together with it to provoke the trial.
- The primary Historical Magic Hint seems immediately in entrance of you, on the opposite facet of the spiderweb.
- Observe the trail and defeat the spider enemies.
- The second Historical Magic Hint is behind one other set of spiderwebs.


- When you’ve grabbed the primary two and defeated the spiders, look in direction of the citadel north of the place you obtained the second magic hint.
- You must see some stables on the facet and a damaged wagon.


- Climb the damaged wagon and use it to leap onto the ledge that leads into the outlet within the wall.
- You’ll be able to solely use the ledge in your left. The ledge immediately below the magic hint received’t register while you leap.


- Head via the outlet to acquire the third and last Historical Magic Hint.


Hogwarts Valley Historical Magic Hotspot #4
- Closest Floo Flame – West Hogwarts Valley
- Spells Wanted: Accio
- Broom/Mount Required? – No
This Historical Magic Hotspot for Hogwarts Legacy is situated southeast from the West Hogwarts Valley Floo Flame.


- Head in direction of the middle to activate the magic pool.
- While you activate it, you’ll first need to head straight towards the deal with in entrance of you and solid Accio.


- This can set off a platform that you just’ll want later.
- After triggering the platform, head north to the wall. There’s a doorway right here with vines protecting it.
- Use Incendio to clear the vines.


- Enter the room and navigate beneath the picket panels.
- Destroy the bins right here and discover the primary Historical Magic Hint.


- After you’ve grabbed this hint, flip again, and in the identical room is a ladder.


- Climb the ladder, and you should utilize the platform you triggered earlier to seek out the second Historical Magic Hint.


- When you’ve obtained the second Historical Magic Hint, climb the ladders to succeed in the highest of the tower.
- Destroy the bins protecting the doorway of the tower.
- Contained in the tower are just a few hatchlings you’ll need to defeat earlier than grabbing the third Historical Magic Hint.

Hogwarts Valley Historical Magic Hotspot #5
- Closest Floo Flame: Keenbridge
- Spells Wanted: N/A
- Broom/Mount Required? – Sure
While you arrive at Keenbridge, head down the westward path. This can lead you on to the ruins of the fifth Hogwarts Valley Historical Magic Hotspot.


- While you first arrive on the location, you’ll discover the pool of historic magic exterior of the home on the patio.
- Work together with the pool, and also you’ll see the primary Historical Magic Hint above the hearth on the high of the chimney.
- Use your broomstick to fly up and seize it.


- The second Historical Magic Hint is a distance away, immediately southwest of the place you picked up the primary.
- Use your broom to fly over and seize it.


- The third Historical Magic Hint is within the path of the floo flame you used to get right here.
- Flip your broom to face east and fly in direction of the open plain. The magic hint is sitting on a small stone.


Hogwarts Valley Historical Magic Hotspot #6
- Closest Floo Flame: Keenbridge
- Spells Wanted: Accio, Levioso, Incendio
- Broom/Mount Required? – No
From the Keenbridge floo flame, flip southwest, and see a home on a ledge. Use your broomstick to fly over to it.


- While you first arrive, you’ll spot the pool of historic magic close to the ruins’ entrance. Work together with it to activate it.
- Forged Incendio to take away the vines from the doorway. Inside look to the appropriate, and also you’ll see the glow of historic magic hint coated by some bins.
- Destroy the bins and seize the primary historic magic hint.


- In case you look to your left, you’ll see a platform you’ll be able to transfer with Accio or Wingardium Leviosa. Transfer the platform and canopy the outlet from which you simply obtained the magic hint.


- Forged Levioso to elevate the platform and use it to succeed in the ledge.
- Climb the ladder, and also you’ll discover a movable platform much like the one you used to climb the ledge.
- Transfer the platform in direction of the northeastern picket platform’s edge.
- Behind it, a pathway results in the second Historical Magic Hint.


- Return to the platform. Forged Levioso on the platform you moved.
- Climb the platform and onto the ledge. You’ll see the third and last Historical Magic Hint.


Feldcroft Area
Feldcroft Area Historical Magic Hotspot #1
- Closest Floo Flame: North Feldcroft
- Spells Wanted: Incendio
- Broom/Mount Required? – No
Head north from the North Feldcroft Floo Flame till you attain a plateau. You’ll see a small stone platform. The traditional magic pool is right here to work together with.


- Work together with the traditional magic pool.
- Stroll down the staircase and encounter the primary Historical Magic Hint.


- Proceed to move down the trail towards the stone ruins within the distance.
- On the left facet of those ruins is an entrance coated by vines. Use Incendio to clear the vines and discover the second Historical Magic Hint.


- Climb the ladder to succeed in the highest of the ruins.
- When you attain the highest, you’ll discover the third and last Historical Magic Hint.
- You too can take your broom and fly on to the third magic hint after which leap right down to the second magic hint, as proven within the footage above.


Feldcroft Area Historical Magic Hotspot #2
- Closest Floo Flame: Rockwood Citadel
- Spells Wanted: N/A
- Broom/Mount Required? – No
From Rockwood Citadel Floo Flame, you’ll want to move northeast. When you attain the river, comply with it till you attain a small tower. Drop right down to the ledge going through the river. The traditional magic pool is on a big rock.


- Work together with the traditional magic pool to start the trial.
- The primary Historical Magic Hint will seem immediately in entrance of you. Use the ladder to climb as much as the platform and seize it.


- Proceed to climb up the platform till you attain a ledge you’ll be able to leap on. Use Incendio to do away with the leaves and climb up the ledge.
- Seize the second Historical Magic Hint right here.


- Proceed left via the picket panels and switch proper. You’ll see a big rock held up by a gear.
- Shoot the gear along with your fundamental solid, and it’ll reveal the third and last Historical Magic Hint.


- Leap on the platform and seize the ultimate magic hint.
Feldcroft Area Historical Magic Hotspot #3
- Closest Floo Flame: Feldcroft
- Spells Wanted: N/A
- Broom/Mount Required? – Sure
Head immediately east from the Feldcroft Floo Flame. Ultimately, you’ll come throughout some ruins. Use Depulso to interrupt the rocks and reveal a doorway. The traditional magic pool is simply previous this doorway.


- Activate the traditional magic pool to provoke the trial.
- The primary Historical Magic Hint is inside a ruined stone pillar immediately forward of you.


- You need to defeat just a few trolls or sneak previous them for the next magic hint. So that you’ll must equip your finest spells for both route.
- The second Historical Magic Hint is contained in the troll camp below their tent.


- Fortunately, the third Historical Magic Hint is rather a lot simpler to acquire. However you’ll want your broom.
- Look in direction of the north, and also you’ll see the stays of a citadel. On the high of the stays is the third magic hint.


- Use your broom to move up there. There’s additionally a touchdown platform to activate whilst you’re there.
Feldcroft Area Historical Magic Hotspot #4
- Closest Floo Flame: Irondale
- Spells Wanted: Incendio
- Broom/Mount Required? – Sure
While you arrive at Irondale, look south. You’ll see the facet of a rock formation. Observe this rock formation and see a citadel with gentle blue/yellow banners. That is the situation of the traditional magic pool.


- While you activate the trial, head into the citadel and take a proper. You’ll come throughout a magic hint blocked off by vines.
- Forged Incendio to burn the vines and acquire the primary Historical Magic Hint.


- In case you flip again in direction of the arch you entered from, you’ll see the second Historical Magic Hint on the high of the arch.
- Use the platforms to the appropriate to climb towards the magic hint. You too can use your broom to seize it rapidly.


- From this platform, look south and see the third Historical Magic Hint.
- You’ll be able to both use your broom to seize it rapidly or leap down and stroll in direction of the staircase.
- Leap on the ledge and seize the ultimate magic hint.


Poidsear Coast
Poidsear Coast Historical Magic Hotspot #1
- Closest Floo Flame: Phoenix Mountain Cave
- Spells Wanted: Alohomora, Incendio, Accio, Depulso, Levioso
- Broom/Mount Required? – No
Head south from the Phoenix Mountain Cave, and also you’ll come throughout a brick home close to the trail. The traditional magic pool is true close to the entrance door.


- Head into the home. You’ll want to make use of Alohomora Stage 1 to unlock the lock.


- When inside, stroll straight and solid Depulso to take away the picket boards.
- Stroll via the doorway and look left. Use Depulso to clear the rocks. This can reveal the primary Historical Magic Hint.


- Head again via the doorway and look proper. Clear the particles and use Accio on the platform.
- Transfer the platform to the northwest nook of the room. You’ll discover some dried-up grass and damaged wooden right here. Place the platform on high of that particles.
- Forged Levioso on the platform and climb on it. Use Incendio to clear the spiderwebs.
- Leap in direction of the opposite facet of the ground. Observe the trail, and also you’ll see the second Historical Magic Hint.


- When you seize the second magic hint, use the ladder to climb onto the following flooring.
- Use the ground boards to navigate to the opposite facet of the ground the place the third Historical Magic Hint is.


Poidsear Coast Historical Magic Hotspot #2
- Closest Floo Flame: South Poidsear Coast
- Spells Wanted: Accio, Levioso, Incendio, Depulso
- Broom/Mount Required? – No
While you arrive on the South Poidsear Coast floo flame, you’ll see the Historical Magic Hotspot traces close to the bridge. Observe them and see the traditional magic pool earlier than the bridge.


- When you activate the Historical Magic Hotspot, cross the bridge. You’ll see a constructing to your left.
- Climb up the platform and use Depulso on the picket boards. This can clear the best way.


- Seize the primary Historical Magic Hint after clearing the wooden. Leap again down and head to the constructing in your proper.
- Enter via the primary door.
- Go below the boards to your left, and within the different room, you’ll see Satan’s Snare blocking the second Historical Magic Hint.


- Use Incendio to clear the Satan’s Snare and rapidly roll into the room to seize the second magic hint.
- There’s a deal with going through the Satan’s Snare. Forged Incendio to clear the vines and Accio to drag the deal with.


- This reveals a door to your proper with a platform inside. Forged Accio to drag the platform.
- Place the platform close to the picket flooring above the deal with. Forged Levioso to boost the platform.
- Leap on the platform after which onto the picket flooring.


- Undergo the picket flooring and seize the ultimate Historical Magic Hint.


Marunweem Lake
Marunweem Lake Historical Magic Hotspot #1
- Closest Floo Flame: Marunweem Bridge
- Spells Wanted: Alohomora Stage 3, Reparo
- Broom/Mount Required? – No
Head to the Marunweem Bridge floo and cross the bridge. The traditional magic pool is immediately on the opposite finish of the bridge. Activate it to start the trial.


- The primary Historical Magic Hint is situated on to your left. The digicam will pan straight to it while you activate the trial.
- Use Reparo on the picket floorboards scattered round you. This can construct a platform you’ll want.
- Use the picket stairs to climb the ledge and seize the primary magic. You’ll must do a little bit of platforming right here.


- Stroll via the platform you repaired earlier and climb the ledge.
- Observe the steps, and also you’ll end up with a bridge mechanism. On the opposite facet is a deal with.


- Forged Accio to set off the deal with. This can decrease the bridge.
- Cross the bridge and switch the nook. Defeat the enemies.
- The second Historical Magic Hint is locked behind a door. You’ll want Alohomora Stage 3 to unlock it.
- Inside this room is a legendary chest, so don’t neglect to seize it.


- When you’ve grabbed the second magic hint, return to the place you fought the goblins.
- Look West, and also you’ll see a small picket platform planking over the sting.
- In case you look beneath this platform, you’ll see the third and last Historical Magic Hint on high of a ship.


- Leap into the water, and also you received’t take fall injury.
- Swim to the boat to seize the ultimate magic hint and full this Historical Magic Hotspot.
Marunweem Lake Historical Magic Hotspot #2
- Closest Floo Flame: Marunweem Lake
- Spells Wanted: Depulso
- Broom/Mount Required? – No
From the Marunweem Lake Floo Flame, head in direction of the lake’s edge and comply with it eastward. Ultimately, you’ll come throughout a home with Inferius enemies.
Defeat them and activate the traditional magic pool close to the tombstone with a protect in entrance of it. Activate it to start the Historical Magic Hotspot trial.


- The primary Historical Magic Hint is immediately above you to the appropriate.
- Head into the ruins. Take a direct left and comply with the picket construction till you see a platform you’ll be able to climb on.


- Climb to the highest and use these platforms to navigate towards the primary magic hint.
- As soon as you’re one platform away from the magic hint, solid Depulso on the rotating pillar. This can convey up a platform from the wall with a Kelpie picture on it.


- Forged Depulso just a few occasions till you’ll be able to leap onto the platform to simply seize the primary magic hint.
- When you’ve grabbed it, leap again to the platform the place you solid Depulso.
- From right here, flip in direction of the center of the ruins, and also you’ll see a platform with a doorway blocked by a crate.
- Leap on this platform and use your fundamental solid on the gear to drop the crate beneath.


- Leap throughout to the opposite facet. Face southwest and leap to that platform subsequent.
- Look in direction of the lake and see one other platform to leap to.
- From right here, comply with the picket path, and also you’ll see the second Historical Magic Hint on a picket platform. Leap in direction of it to seize it.


- The third and last magic hint is in the course of the ruins. You’ll see it locked behind a gate.
- Destroy the bins to the appropriate of the magic hint. This can reveal a rotating pillar.
- Forged Depulso on it to boost the gate and seize the third Historical Magic Hint.


Manor Cape
Manor Cape Historical Magic Hotspot #1
- Closest Floo Flame: West Manor Cape
- Spells Wanted: Depulso, Levioso, Alohomora, Wingardium Leviosa
- Broom/Mount Required? – Sure
From the West Manor Cape, head northwest up the mountain. Ultimately, you’ll come throughout a big mansion with a courtyard. Head into the mansion, and the traditional magic pool is close to a firepit.


- Use Revelio to disclose a highlighted flooring above you.
- Forged Depulso on the ground ot convey it down and a movable platform.


- Use Wingardium Leviosa to maneuver the platform close to the ledge. Forged Levioso to boost the platform.


- Climb the ledge, and also you’ll discover the primary Historical Magic Hint.
- From right here, use Revelio to focus on the second magic hint above you.


- Mount your broomstick and fly as much as the ground its on. Seize the second Historical Magic Hint.
- From right here, stroll via the picket panel and discover a locked door. Use Alohomora to unlock it and reveal a frog statue.


- Work together with the frog statue; it’ll ship you straight into the third Historical Magic Hint.
Cragcroftshire
Cragcroftshire Historical Magic Hotspot #1
- Closest Floo Flame: West Manor Cape
- Spells Wanted: N/A
- Broom/Mount Required? – No
From the West Manor Cape Floo Flame, hop in your broom and head East over the lake. Ultimately, you’ll come throughout some citadel ruins. Head to the bottom of the ruins close to the doorway with a torch.
The Historical Magic Hotspot is simply previous the doorway.


- Head up the staircase, and the primary Historical Magic Hint is on the finish of the steps.
- You’ll must do some platforming to get to it.


- When you seize it, proceed climbing the ruined stair case. Leap on the ledge and make your approach to the highest.
- The second Historical Magic Hint is on the high on a platform. Climb the platform to seize it.


- Fortunately, the third and last Historical Magic Hint is immediately beneath you. Look in direction of the northwestern ledge.


- You’ll see the beam of the magic hint. Leap down to soak up it.
When you’ve completed this Historical Magic Hotspot, you’ll have accomplished each hotspot in Hogwarts Legacy.
With all of the upgrades, you’ll be able to maintain 5 Historical Magic expenses.
Methods to Enhance Historical Magic Meter Hogwarts Legacy
You’ll want to finish a number of Hogwarts Legacy Historical Magic Hotspot trials to extend your Historical Magic Meter.
- 2 Historical Magic Hotspots – First Improve
- 6 Historical Magic Hotspots – Second Improve
- 12 Historical Magic Hotspots – Third Improve
When you’ve accomplished these steps, it’s essential to head into your menu and navigate from Challenges to Exploration.
Within the Exploration tab, you’ll be able to declare your rewards.


[ad_2]
Source link
